Follow my Journal — JHåland — Motion Branding — Animerte Merkevarer

Viewing entries tagged
c4dtoa

So many threads! New year, new computer!

Comment

Share

So many threads! New year, new computer!

New year, new computer!

After the release of AMD Ryzen Threadripper computer processors the following years, that look really promising on both price and power, I jumped on the wagon and upgraded my system.

My criteria: I wanted it to be as up to date as possible (many programs ended their Windows 7 support). Have the best graphic card that worked great with Arnold renderer GPU version (CUDA cores). Storage that reading and wright really really fast. And a case that can run as silent as possible.

Specs:

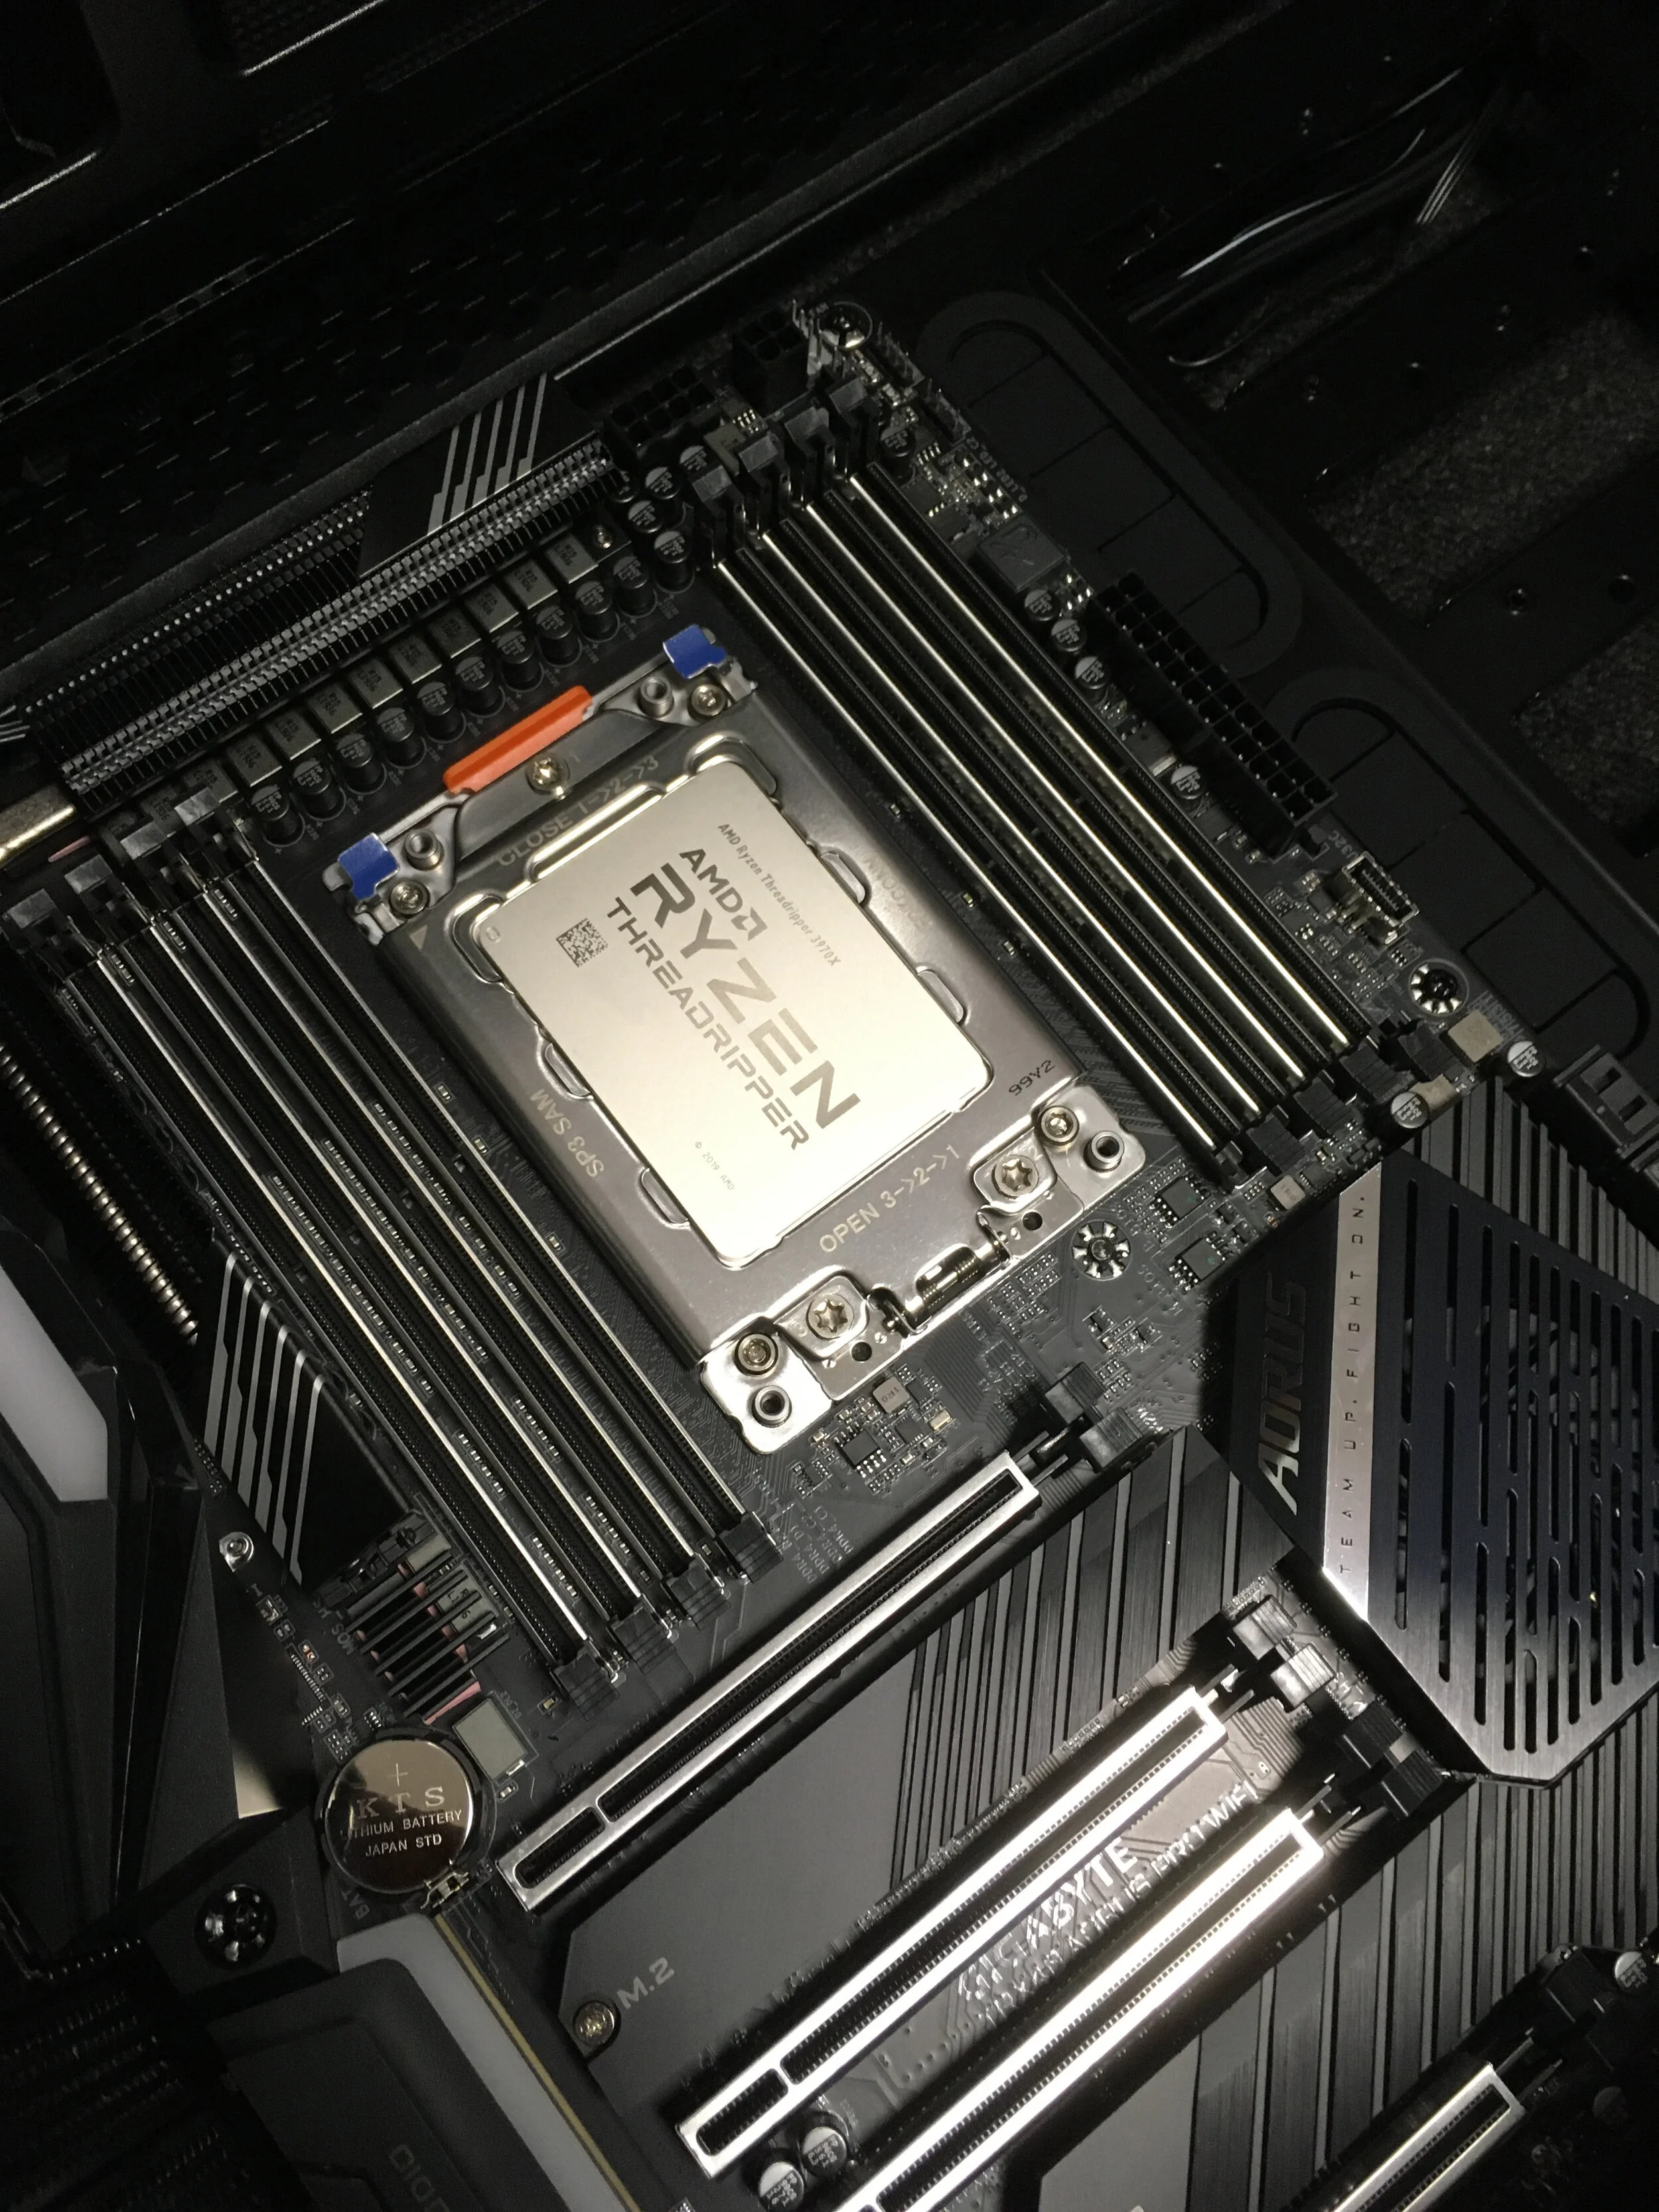
AMD Ryzen ThreadRipper 3970X - 3.7 GHz - 32-cores - 64 threads (CPU)
Noctua NH-U14S TR4-SP3 CPU cooler
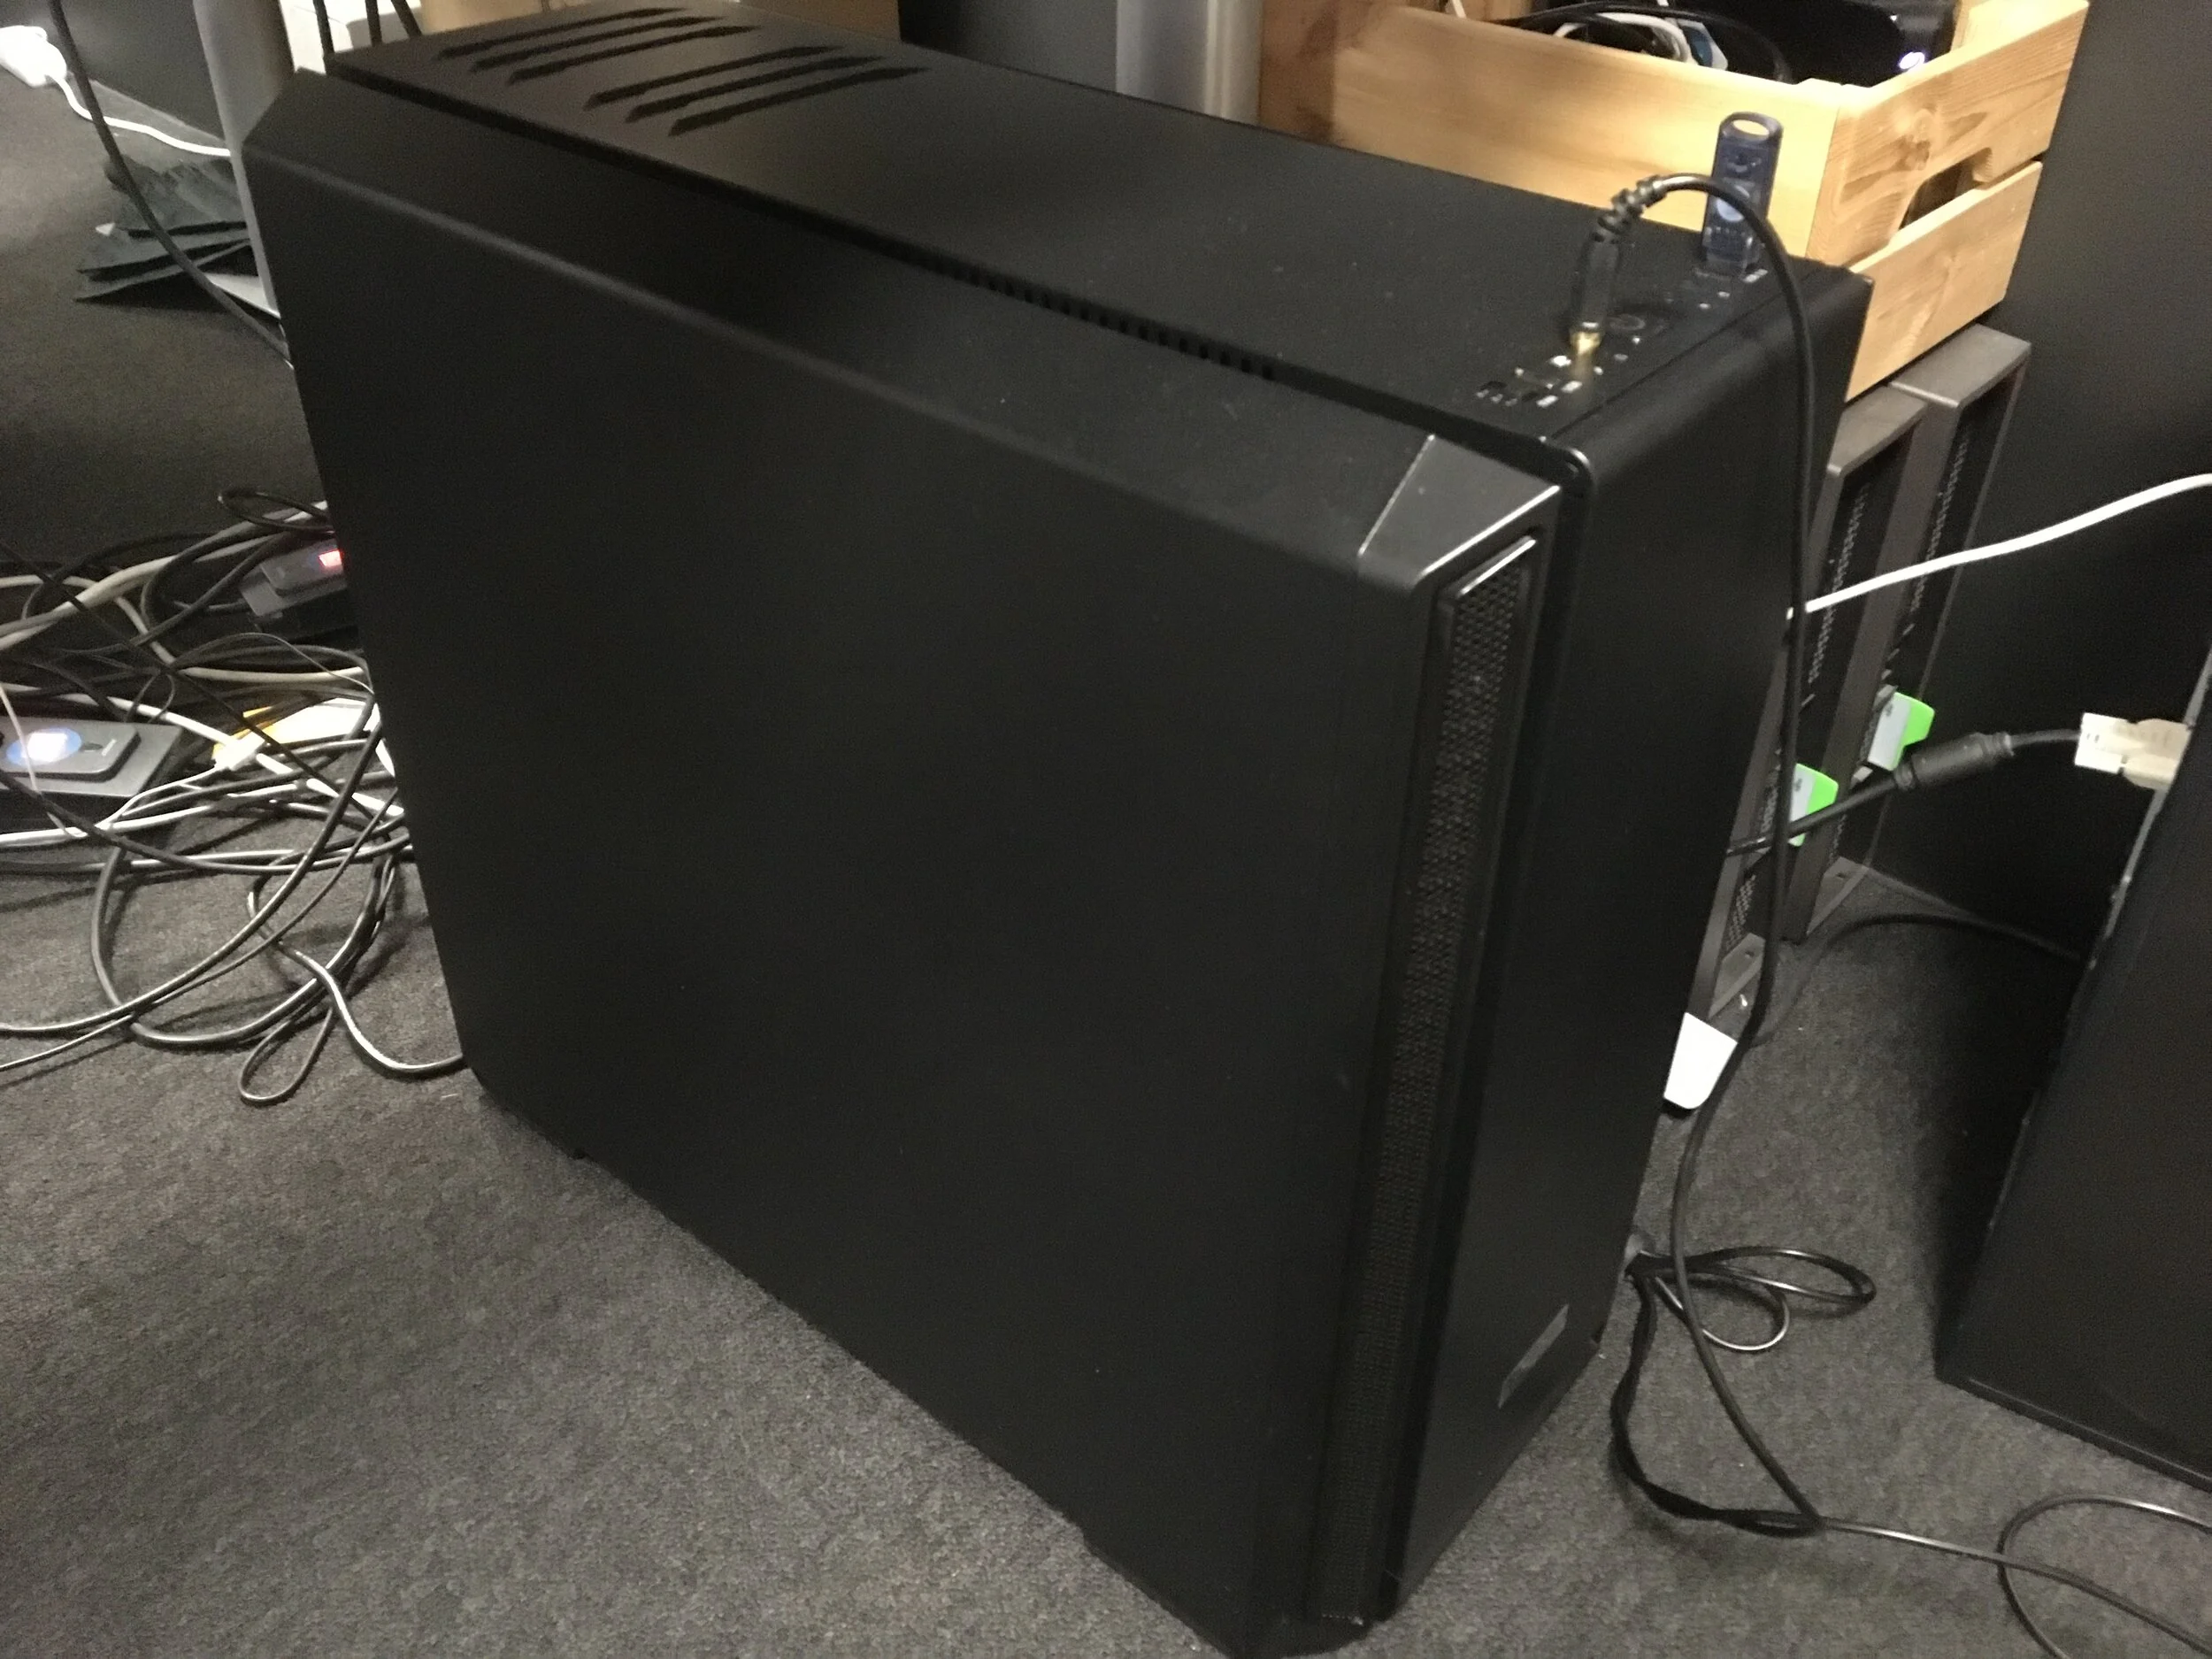
be quiet! Silent Base 601 - Black - Cabinet (no glass, no RGB “fanciness”, just a black box)
Microsoft Windows 10 Pro 64bit
GIGABYTE TRX40 AORUS PRO WIFI - AMD TRX4
Kingston A2000 1TB NVMe M.2 SSD
HyperX Fury DDR4 2666MHz 64GB
ZOTAC GeForce RTX 2080 Ti
Noctua NF-A15 PWM - 140 mm - 19 dBA (cool the CPU)
Noctua NF-A14 PWM - 140 mm - 19 dBA (Cabinet fan)
Cooler Master V Series V1000 1000watt

cine.jpg

So if you know any of these parts a question would be; why do I cool the system with fans and not a water cooler? I hate noise and after a lot of research I found that there’s a lot of good low noise fans that work as good as a water cooler. And with fans I would not hear the gurgling noise form the water pump.

If there’s anything that could be better is the be quiet! cased. It came with some noisy fans. And with some tinkering in bios, an picking up two Noctua fan, I could cool my system from 95 °C to 85°C at full load over time, with out bugging me and the rest of the office at all. But I think I would like it around 70 °C on full load and need to pick up some more fans and get rid of the be quiet! ones.

The system is blazing fast and stable, a must for me, I don’t want the computer to hold me back in any way when working on a project. And I can’t do any over clocking, since I want it stable for work and not only showing off :P

Cinebench r20 score: 17257 pts!. Many test online has a Cinebench around 16988 pts.

I’m now hoping I’m done with online render farms. The computer is about ten times faster then my 2018 MacBook pro, making it easier to get the rendered images I want.

Some images from the computer build.

Comment

Share

OSL Window shader

Comment

Share

OSL Window shader

I’m exploring the possibilities of OSL shaders with Arnold Renderer.

These are shaders often written as small helpers across different platforms. It works with Vray, Arnold Renderer, Render Man, Octane and Blender.

In this case you can create a WindowBox, Interior Mapping or Parallax Mapping really fast. You just follow the instructions to create a room with 5 sides a middle ground and front (curtain), and the OSL file it self is added to your c4dtoa shader folder.

Download it for free here

Comment

Share

C4dtoa hair fix

Comment

Share

C4dtoa hair fix


I came over a problem with the Arnold Hair. You can see in the picture that the hair doesn't pick up the color from the texture, and as usual it's an easy fix.

You add an Arnold Tag, and tick the Export UVs. In the hair material you add your texture to the standard hair shader.

Good luck!


Comment

Share

Follow up tutorial and PBR texture freebies

Comment

Share

Follow up tutorial and PBR texture freebies


In this follow up tutorial on how to create Object ID for your fabrics, I only use Photoshop to create these maps. This really depends on your source texture and other element if it's easy or hard. Sometimes you need to do a lot of small tweaking to make it work, and here I show you the main principles.

In this follow up tutorial on how to create Object ID for your fabrics I use only Photoshop to create these maps. This really depends on your source texture and other element if it's easy or hard. Sometimes you need to do a lot of small tweaking to make it work, and here I show you the principles.

If you haven't seen Fabulous Fabrics I recommend you do that :)

Poliigon has started creating fabric textures with Object ID maps. They add a more convincing look on your fabric, and they are really easy to create your self. In Arnold render you can connect these to the coat layer in standard surface (Arnold 5) and I really like the result that gives.

You find the free texture pack here:


Comment

Share

Fabulous Fabric with Object ID maps

Comment

Share

Fabulous Fabric with Object ID maps


Poliigon has started creating fabric textures with Object ID maps. They add a more convincing look on your fabric, and they are really easy to create your self. In Arnold render you can connect these to the coat layer in standard surface and I really like the result that gives.

I show how I used it to create a wool material for a Hiroshima Chair by Naoto Fukasawa.

If you have a material suggestion, write it in the comments :)

Here is the free Fleece texture: https://www.poliigon.com/texture/2332
(and I have nothing to do with their site :)

Cinema 4D https://www.maxon.net/en/
Arnold Render https://www.solidangle.com/
Photoshop/Illustrator http://www.adobe.com/


Poliigon has started creating fabric textures with Object ID maps. They add a more convincing look on your fabric, and they are really easy to create your self. In Arnold render you can connect these to the coat layer in standard surface and I really like the result that gives.

Comment

Share

Arnold Ice Material Tutorial  - Using Cinema 4d, Arnold Render, B2M & Photoshop - Texture02

2 Comments

Share

Arnold Ice Material Tutorial - Using Cinema 4d, Arnold Render, B2M & Photoshop - Texture02


In this tutorial I show how to create an ice material for Arnold Render. In photoshop I make the material base based on a picture. It's made square and seamless for ease of use. Then processed in Bitmap2Material to create different texture maps. Then mixed together in Arnold Render.

In this tutorial I show how to create an ice material for Arnold Render. In photoshop I make the material base based on a picture. It's made square and seamless for ease of use. Then processed in Bitmap2Material to create different texture maps. Then mixed together in Arnold Render.

This is a little more advanced then the first material tutorial, and hope you like it.

Cinema 4D
Arnold Render
Anders Langalands
Bitmap2Material
Photoshop


2 Comments

Share